If you have a spare computer and a PC-BSD DVD, you can install and start using PC-BSD in under 45 minutes.
You can start with Using the Live DVD. This will enable you to try out PC-BSD without destroying the data on your computer. As you become more comfortable with the idea of performing an installation that will replace the current operating system on your computer with PC-BSD.
This post discusses all of the possibilities that can occur during an installation. By understanding what each setting does, you can decide whether you want to change it or accept the default setting. Also discuss settings of interest to users who would like to perform an installation that doesn’t overwrite the existing operating system. I will show you how to create free space for the PC-BSD installation and how to configure a boot manager so multiple operating systems can exist on one computer.
What’s New in PC-BSD 8
Some of the notable features of this release include the following:
- New system installer: The system installer was completely rewritten. It now enables users to test their keyboard layout and to install FreeBSD or PC-BSD,and provides a summary of the installation settings. The back end of the installer is scriptable, allowing advanced users to fully customize their installations.
- Software Manager: This now includes a software browser, enabling users to easily find and install software in the same utility that is used to remove and update installed software.
- Life Preserver: PC-BSD now includes an easy-to-use backup utility.
- Nvidia for AMD64: Nvidia GeForce1 video cards are now fully supported on both the 32- and 64-bit versions of PC-BSD.
- Adobe Flash Player 10: As of this writing, 10 is the latest version of Flash, meaning you can view any flash content in PC-BSD.
- KDE 4.3.4: As of this writing, this is the latest version of KDE.
- New USB system: The entire USB system was rewritten for FreeBSD 8, making it easier to work with USB devices.
- Filesystem support: PC-BSD now supports encrypted filesystems and the ZFS filesystem.
System Requirements
To install PC-BSD, you must first determine whether the hardware on your computer meets the minimum requirements.If your computer is fairly new (less than 5 years old), it should be fine. If your computer is older, double-check that it meets the minimum requirements.
Minimum for PC-BSD Installation
At a bare minimum, your computer needs to meet the following hardware requirements:
CPU: Pentium 2 (introduced in 1997)
Disk space: 10GB of free space
Memory: 256MB of RAM
Minimum for FreeBSD Installation
The FreeBSD installation is meant for relatively advanced users. Existing FreeBSD users should be aware that the PC-BSD installer does not allow you to select which FreeBSD distributions to install—for example, User, Developer, or Minimal. The minimum requirements listed next are based on the requirements of the installer.
If you’re looking for a FreeBSD minimal installation on a low-end computer, you should install from FreeBSD media instead of the PC-BSD installer.Available disk space: 4GB of free space
Memory: 256MB of RAM
Recommended
Although the minimum requirements will allow you to install PC-BSD, you can never have too much CPU, disk space, or RAM. In fact, the more you have, the better your computing experience. The PC-BSD project recommends the following minimum hardware in order to get the most out of PC-BSD:
CPU: Pentium 4 or higher (introduced in 2000)
Available disk space: 30GB of free space
Memory: 512MB of RAM
Video: Some advanced features such as desktop effects and 3D games require a 3D video card. PC-BSD supports 3D acceleration on most Nvidia cards and some Intel integrated cards.
Determining Hardware Settings
There are many utilities available for determining what hardware is installed on a computer. I use Parted Magic because this open source program can also be used to create free space on your computer.
After you have the CD, insert it into your CD drive, boot the computer, and press the spacebar when you see the menu(access your BIOS and change the boot order so your computer boots from CD first).
To determine the hardware on your system, press the spacebar when you see the Parted Magic menu to stop it from loading. Use your up arrow to highlight the Extras menu and press Enter. Press Enter again to start the Hardware Detection Tool (HDT)
Parted Magic also provides a graphical interface to show you your hardware, but that tool may not give you all of the information you’ll need about your video card.You can now use your up and down arrow keys to highlight entries, and your left and right arrow keys to move between menus. Use the right arrow key to expand a menu and the left arrow key to go back.
You should write down the following information:
- Disks ➤ Disk 1: Make note of the size of the disk. If you are planning oninstalling PC-BSD without losing the current operating system(s) on thecomputer, carefully record the Size and Type for each partition.
- Memory ➤ Bank 0: Note the Size. Repeat for each of the listed Banks (the number of banks will depend on your hardware). Adding up all of the listed sizes will show the total amount of RAM on the computer.
- Processor: If the FSB setting is higher than 66, your CPU meets the minimum installation requirements. Also check the X86_64 setting. If it is set to No, you must install the 32-bit version of PC-BSD. If it is set to Yes, you must install the 64-bit version of PC-BSD.
- VESA ➤ VESA Bios: The Vendor and Product will be needed when you select your optimal video settings.
- When finished, arrow down to Reboot and remove the CD.
Obtaining PC-BSD
Downloading and Burning a .iso File: If you want to download and burn your own DVD, the PC-BSD web site contains everything you need to get started.The main page of the web site always indicates which version is the “Current Release”, and that is the one that you want to download.Occasionally, the front page will also describe a future release that is in its testing phase.
Unless you are helping the community test a release, you don't want to download a testing release; you can spot these as the version name will include the word “beta” or “RC”(release candidate). It will also have a different version number than the one indicated by “Current Release”.As of this writing, the current release of PC-BSD is 8.0—the number after the 8 may be higher when you go to download the current release.
To download PC-BSD, click on the Download link in the PC-BSD 8.0 Released section. Notice that there are several hyperlinks to choose from.
- Before downloading anything, determine if your computer is 32 or 64 bit, as described in the previous section on “Determining Hardware Settings”. You can then choose which file(s) to download.
- If you have a fast Internet connection, download the DVD version that matches your hardware (32 or 64 bit). The DVD version contains everything you need, but it is a large download—about 4GB.
- If you have a slow Internet connection or a limit on how much you can download, consider downloading the CD files instead. These files are a smaller download (about 700MB each), but you will need to download both CD #1 and CD #2 to complete the installation, plus CD #3 if you want to install additional software during the installation.
- Advanced users also have the option to download USB and boot-only images.
The CD version does not contain the live version of PC-BSD. Here we refer to the “PC-BSD DVD”. If you are using CDs instead, you can use them to do everything except using the Live DVD.
If you click a hyperlink to start a download, it will indicate the name of the file that will be downloaded, its size, and the MD5 sum of the file. The filename will end in .iso, indicating that it is an image that is meant to be burned to a CD or DVD media. This means that the CD/DVD drive in your computer needs to be writable—it will be marked as CD-RW or DVD-RW, where the W means that it is capable of writing. You will also need an application that is designed to write .iso files to media.
If this seems too complicated, click on the Store link to purchase a DVD, or get a friend to help you burn your own.If you decide to download a file, click the arrow next to its Download button. This will allow you to choose a download site—pick the one(mirror) that is closest to your geographic region. Once the download is finished, you should check that the MD5 sum on the file you downloaded is the same as the MD5 sum next to the download link.
The section entitled “Data Integrity Check” in the user guide shows you how to do this for Windows and Linux/BSD. Mac OSX users can use the following command at a command prompt: openssl md5 name_of.isoReplace “name_of.iso” with the name of the file that you downloaded. In the rare event that the md5 is not the same value, this indicates that there was a problem with the download. You will need to download the file again, preferably from a different mirror. If you are an advanced user, you should email the PC-BSD testing mailing list so the developers can check to see if there is a problem with the file on the download mirror.
Once you have verified the file's checksum, you can burn the DVD or CD using your favorite burning application or the instructions in the user guide.
The PC-BSD project also gives away thousands of DVDs each year at free software conferences. The main page of the pcbsd.org web site lists the location of these conferences in the Upcoming Events section. If a conference is near you, drop by the PC-BSD booth to pick up a DVD and talk with people from the PC-BSD project.
Using the Live DVD
A live DVD enables you to take an operating system for a “test drive” to see whether you like it before committing to an installation of the operating system on your computer.It is also an excellent way to check whether the operating system understands all of your computer hardware. If it works on the live DVD, it will also work when you install the operating system.To use the PC-BSD live DVD, insert your PC-BSD DVD into your computer's DVD tray and boot your system. When you see the Welcome to PC-BSD menu press your spacebar to pause the menu. You can then press the number 3 key to boot PC-BSD in Live mode. You will see a series of text messages on your screen as PC-BSD boots.
That’s it! After the computer finishes booting, you can use the live environment. Here are some things to be aware of when using the live DVD:
- Bootup is slower because everything needs to be copied from the DVD to the live filesystem.
- Any changes you make are copied to the live filesystem and will disappear when you reboot. If you create any files, save them to a USB drive or floppy before rebooting. Otherwise, they will disappear.
- The live filesystem is small (about 30MB), so you will need to download or create large files on a USB drive.
- If your computer does not have much RAM, you will find the live DVD slower than the installed version of PC-BSD.
- Remember: A live DVD is a tool to try out an operating system. If you want to use the operating system on a regular basis, you should install it instead.
Using a Virtual Environment
A virtual environment allows you to perform an installation into a “virtual” computer. From a practical point of view, this means that you can install and use PC-BSD within a window on your existing operating system. This installation is virtual because it does not overwrite any of the data on your computer and you can continue to use your existing operating system as usual. However, the installation is real in that it allows you to fully use the operating system that was installed into that window, just as if it were the only operating system on your computer.To perform this bit of magic, you need to first install a virtual computing application. We recommend the VirtualBox application because it is free, easy to use, and available for Windows, Mac OS X, Linux, and BSD. You can download the Windows, Mac, and Linux versions of VirtualBox.
Existing FreeBSD users can install the VirtualBox package or port. Existing PC-BSD users can install the VirtualBox PBI by using Software Manager.After the VirtualBox program has been installed and started, you will need to create a virtual machine. This machine contains the settings for the window where you will install PC-BSD.
Click the New icon to start the New Virtual Machine Wizard. Your machine will need the following settings to successfully install PC-BSD into it:
- Name: Choose a name that makes sense to you.
- OS Type: Select BSD from the drop-down Operating System menu and keep FreeBSD as the version.
- Base Memory Size: Change this number to 256.
- Virtual Hard Disk: Keep the default settings of the boot hard disk and create a new hard disk.
- Storage Type: Keep the default of Dynamically Expanding Storage.
- Location: Give the folder a name that makes sense to you and double-check that its location is in an area with enough disk space to hold the size of the virtual machine.
- Size: This needs to be changed to at least 10GB.
icon and highlight the CD/DVD-ROM setting, Select the Mount CD/DVD Drive check box, which should select the make and model of your drive(or directly the .iso image). If you have multiple DVD drives or you have plugged in an external USB DVD drive, use the drop-down menu to select the DVD drive you wish to install from.
If you have downloaded PC-BSD, you can mount the .iso file directly without having to first burn it to a DVD. Select the ISO Image File radio button and use the Browse Folders icon to browse to the location where you saved the ISO.When you are finished, click OK to save your changes. You are now ready to install PC-BSD into your virtual machine. If you are installing from a DVD, insert the DVD disk into the drive you specified earlier.
Click the Start button, which will start the virtual machine in its own window. You can then perform the installation as described in the next section.
Tip Don’t worry, installing into a virtual machine will not affect your current operating system. The installation only “exists” within the window of the virtual machine.There are a few things you need to be aware of when using PC-BSD in a virtual environment:
- You need to press the Ctrl key on the right side of your keyboard to switch back and forth between the virtual machine and the applications running on your host operating system. For example, if you try to click your mouse or type something and nothing happens, press your right Ctrl key to activate your mouse/keyboard in that area.
- A virtual environment uses a lot of memory. If your computer does not have much RAM, you will need to be patient because everything will be slower. Closing unused programs may speed things up for you a bit.
- After you’ve installed an operating system into the machine, you will need to tell your virtual machine that you want to boot the operating system, not install it all over again. Highlight the virtual machine entry and click Settings ➤ System to access the menu. Highlight the Hard Disk entry in the Boot Order section and use the up arrow to move it to the top of the list.
If you plan to download large files, make sure the size of your virtual machine is large enough to hold those files. PC-BSD will boot whenever you start the virtual machine and will shutdown whenever you close the virtual machine.
Installation
The best way to use PC-BSD is to install it onto the computer. It will be much faster than using the live DVD or a virtual environment. If you don’t care about what is on the computer now, you can just install PC-BSD and it will erase everything on the computer so it can use all the disk space that came with the computer.However, if you need to keep the operating system that is currently on the computer, things get more complicated.
One solution to make things less complicated is to install PC-BSD onto an external USB drive. If the USB drive is plugged in when you run the Parted Magic CD, it will tell you the size of the drive. Be sure to select the correct drive from the drop-down menu when you reach the “Disk Setup” section of the installation.
The most complicated way is to install PC-BSD onto the same hard drive as your current operating system. If you plan to do this triple-check that you are installing into the correct partition in the “Disk Setup” portion of the installation.
It is important to realize that the default installation assumes that you want to overwrite everything on your computer, or that you have an existing partition that contains no data.To start the PC-BSD installation, insert your PC-BSD DVD. This time, don’t press anything when you see the Welcome to PC-BSD menu, because the default option is to start the installer.
If you wish to save some time, watch the text messages after the menu and type n when the installer asks whether you want to check the integrity of the installer archive.The installer will automatically detect your video card and mouse/pointer device. After the installer is loaded, you will see the Welcome & Language Selection screen.
Language Selection
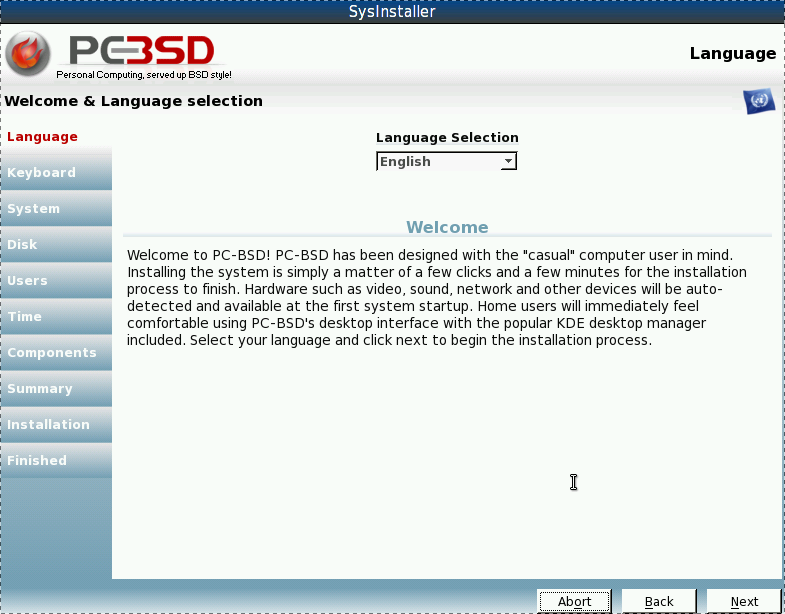
- Abort (stop the installation and reboot the computer)
- Back (return to the previous screen), and
- Next (move on to the next screen). When finished with this screen, click Next to continue.
Keyboard Setup
Enables you to select your
- keyboard model,
- layout, and
- variant.

- If you know that you want to customize these settings, deselect the Use Default check box.
- If you have a non standard keyboard, you can then select your keyboard from the Keyboard Model drop-down menu.
- If your keyboard contains non-English characters, highlight your language in the Preferred Layout menu.
- If you have a Dvorak keyboard, highlight your variant in the Preferred Variant menu.
- If you modify any of these settings, you can test that your settings are correct by typing into the test settings box.
- If you decide you want to go back to the default settings, select the Use Default check box.
Installation Type
Enables you to choose what type of installation to perform (i.e. you can select Network/Internet as the Installation Source).
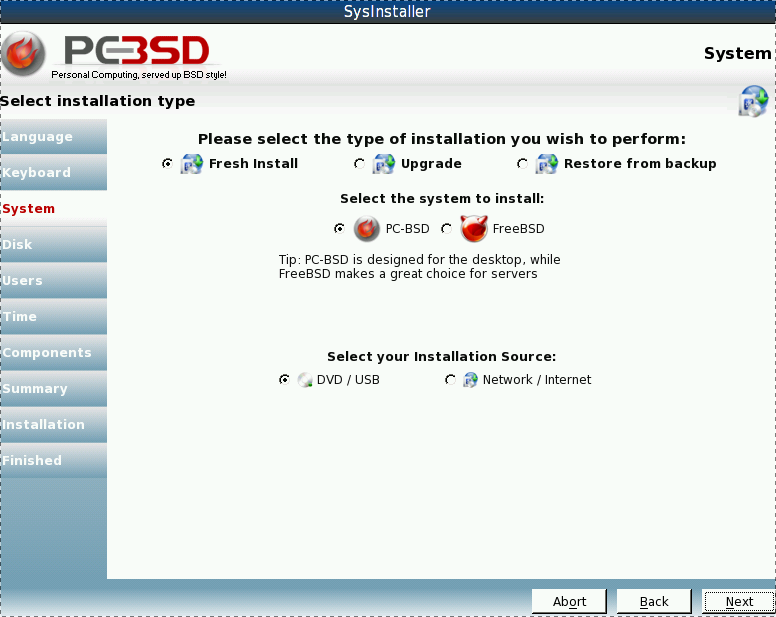
- Fresh Install: This option will format (erase all data) on the disk partition specified in the next menu.
- Upgrade: Select this option when a newer version of PC-BSD becomes available.
- Restore from backup: Advanced users can select this option to repair a PC-BSD system by returning it to its original settings. This option does not keep your data, meaning you have to back it up first.
- PC-BSD: This option installs PC-BSD.
- FreeBSD: This option can be used by advanced users to install the FreeBSD operating system. This installation does not install the X window system, meaning there is no graphical user interface. This option assumes that you already know (or are willing to learn) how to configure a FreeBSD system.
- DVD/USB: This option uses the inserted DVD to install PC-BSD.
- Network/Internet: This enables advanced users to install over an Ethernet network card, as described in the next paragraph. Note that it is quicker to install from the DVD.
- a server on the Internet or
- from a specified server (for example, a server at work or school that has been set up for this purpose).
The installer will attempt to connect to the Internet and, if successful, will fill in the Select Installation Source screen for you.
The default selection will work. However, if you are connecting to a custom installation server (for example, at work), select the Install from Specified Server radio button and enter the settings provided by your system administrator.
Disk Setup
This screen is meant for advanced users to customize their disk partition layout. If you don’t consider yourself to be an advanced user, you should either leave this screen as is, perform the installation on a test computer or virtual environment, or get an advanced user to double-check your changes.

- use the live DVD until you are ready to install,
- find an extra computer to install on, or
- carefully create and choose a free partition on your hard drive to install into.
I recommend that the first time you install PC-BSD (or any other operating system, for that matter), you use a computer on which you don’t want to keep any of the existing data.If you become an advanced user and want to try out new things, you can try more-complex configurations where you dual-boot, meaning the computer has more than one operating system installed.
The easiest disk layout assumes that you want PC-BSD to take up your computer’s entire hard drive. Simply select the Use Entire Disk check box, and the installer will set up everything for you (auto-partition). Remember, this will remove all data that is currently on that hard drive.
If you forget to select the Use Entire Disk box, you will see this error when you click Next: “The install requires a disk/slice with at least 10000MB of disk space.”If you are installing PC-BSD onto an external USB drive, select it from the drop-down menu at the top of the screen. After a drive is selected, any existing partitions will show in the box under the Use Entire Disk check box.
Advanced users can select which partition to install into. If you want to keep an operating system on one of the partitions, it is important that you select the correct partition to erase and install PC-BSD into. Use the partition information you recorded in the “Determining Hardware Settings” section to check that you have selected the correct partition.

Advanced users can customize their disk layout by selecting the Customize Disk Setup (Advanced)
radio button. This will change the screen( + button to add a new partition, which is known as a slice).
If you don’t know what a disk partition is, you should stick with the default of Auto Partition(By default, the installer will create 2GB for /, 1GB for /var, RAM times 2 for SWAP, and the rest of the available space to /usr. The same sizes are used if you click the Auto Partition button).

Disk/Slice: The names of the entries that appear in this menu depend on whether the disk has any existing partitions.
If you select the name that does not include the letter s(slice) followed by a number (ad0 in this example), you are configuring the entire disk. If you select a name that includes the letter s followed by a number, you are configuring an existing partition.

Type: PC-BSD is able to install several types of filesystems. Table 2-1 provides a description of each filesystem type available in the Type drop-down menu. If you’re not familiar with filesystems, the default value of UFS is fine.
Mount Point: This indicates the names of the filesystems. Table 2-2 shows the
most commonly used mount points.

Enable Encryption: PC-BSD uses geli to provide encryption on any filesystem and mount point, including SWAP, ZFS, and /.
The final option on this screen is the Install PC-BSD Bootloader check box. Whether you select this check box depends on whether PC-BSD will be the only operating system on the computer:
- If PC-BSD will be the only operating system on the computer, leave this check box deselected.
- If you will be dual-booting PC-BSD with another operating system, you must select this check box so the boot code will be written to disk—this will be needed, even if you decide to use another boot manager.
- If you plan to add another operating system later, select this option so the PC-BSD boot code is written to disk.
User Creation
Is used to set the administrative password, set up the primary user account, and create any additional user accounts for the system.
The administrator password is also known as the root password or the superuser password. You will need to use this password whenever you make a change to the operating system.
 This screen asks you to input the password twice and will tell you if the passwords do not match. It will also force you to create the root password, meaning that this text box can’t be left empty.
 The Add User section is for the user who uses the computer most often (probably you). You will need to remember the username and password; again, the installer will ask you to type the password in twice and will tell you if the values do not match. Advanced users can select their favorite shell from the drop-down menu. If you don’t have a favorite shell or don’t know what a shell is, the default value is fine.
After you have input the user values, click the +Add button to create the user. If the +Add button doesn’t work, you have forgotten to fill in one of the fields in the Add User section.
You can create as many user accounts as you need and should create a separate account for every user who will use the computer. If you create multiple accounts, the user who uses the computer most often should be created first so that user is first in the list. If you mess up an account, simply highlight it in the list, click – Remove, and try again.
The Auto-Login User check box indicates whether the first user in the list has to type in their password when the computer boots up. The default setting allows that user to be logged in automatically. This is convenient if you are the only user on the computer and you are not worried about anyone else starting your computer and seeing your stuff. If you do not like this default, deselect this check box so that every time the computer boots up, it will present a login screen that will require you to type in your username and password.
Date and Time Zone
Enables you to select your time zone from the drop-down menu. Pick the city that is closest to your geographic area. This will allow your computer to automatically adjust its time whenever daylight savings time starts or stops. By default, the Automatic Synchronization with Internet Time Servers (NTP) check box is selected.
NTP11 is an abbreviation for the Network Time Protocol, which allows a computer to receive its time from a time server on the Internet. Accurate time is needed for some applications (especially those that share data over a network) to work properly. You can deselect this check box if you don’t want your computer to connect to a time server.

Optional Components
The Optional Components screen, enables you to select additional software to install with the operating system.
Here is a brief description of each available component:
- Firefox: Fast, customizable, and secure web browser that supports tabbed browsing and hundreds of plug-ins. See for more details.
- GIMP: Image manipulation and creation utility, similar to Photoshop.
- K3B: Easy-to-use CD/DVD burner.
- OpenOffice: Complete office suite, similar to and compatible with Microsoft Office.
- Pidgin: Instant messaging client that supports AOL Instant Messenger (AIM), MSN, Yahoo!, Google Talk, and many more chat networks.
- FreeBSD ports collection: Allows advanced users to install additional software.
- FreeBSD system source: Allows advanced users to view and use the source for the underlying FreeBSD operating system.
- The Warden: Allows advanced users to easily manage and administer FreeBSD jails.
- VLC: Media player for DVDs, CDs, and streaming video.

If you are installing from CD instead of DVD, you will be prompted to insert CD #3 if you select to install any additional components.
Installation Summary
The Pre-Install Summary screen, provides a summary of your selections. The summary indicates the following:

- Whether this is a fresh install, upgrade, or system restore.
- Whether you are installing from a DVD or from a specified network location.
- How the disk will be formatted. You will want to verify that you’ve selected the correct hard drive or installation partition and review the size of the partitions that will be created.
- Which additional software components will be installed.
- Which user account(s) will be created.

After you click Next and answer Yes to the “Start the installation now?” message, the specified hard drive/partition will be erased and the installation of PC-BSD will begin. During the installation, a progress bar, will show the progress of the installation.
If Something Goes Wrong
PC-BSD could fail to install on your computer, although that possibility is rare. After the installation has started, its progress is written to various logs.
The installer also sets up several virtual terminals where you can input commands and review the logs. You can access the first terminal by pressing Ctrl+Alt+F2. Type root at the login prompt to log in to the terminal, and then cd /tmp to access the location where the logs are located.
Use Alt+F7 to return to the installation screen. Alt+F3 through Alt+F6 represent the remaining virtual terminals.The following logs are created in /tmp:
- .pc-sysinstall/pc-sysinstall.log: Everything the installer does gets copied here. The error will be at the bottom of this log, and everything that succeeded will be before the error. If the install is successful, a copy of this log can be found at /pc-sysinstall.log on the newly installed system.
- sys-install.cfg: All of the settings you selected in the installation menus are stored here.
- xstartup.log: X is the software that is used to load up the graphical interface. If the installer has problems with your video hardware, the error will be in this log.
# cat xstartup.log | /usr/bin/mail -s "installation log"
myname@mycompany.com
Replace xstartup.log with the name of the log file you would like to e-mail to yourself and replace myname@mycompany.com with your own e-mail address.
You can also save the log file to a USB thumb drive. After inserting the drive, you can mount it, copy the log file, and umount the drive with the following commands. Don’t forget to type in that umount command before you remove the thumb drive so PC-BSD knows that you are finished using it.
# mount -t msdos /dev/da0s1 /mnt
# cp /tmp/xstartup.log /mnt
# umount /mnt
Post Installation
The first time you boot into PC-BSD, the Display Settings screen, will prompt you to confirm your display settings. Select the name in the drop-down Video Card menu that most closely matches the Vendor and Model settings you wrote down for your video card. The “Determining Hardware Settings” section at the beginning describes how to find out your video hardware settings if you do not know what video card is installed on the computer.
You can also change your screen resolution at this time. The resolutions that are available will depend on what settings are supported by your video hardware. When finished, click Apply and then OK so your settings can be tested. If you like the resolution, click Yes when you see the Confirm Resolution
screen. If you don’t like the resolution, click No so you can try another resolution.
If you have problems configuring your display settings, use the default Video Electronics Standards Association (VESA) settings, which will work but may not provide your favorite resolution(you must use Vesa with Virtualbox).

If you are installing PC-BSD into VirtualBox and have problems setting the resolution, use System Settings.
Congratulations! You have successfully installed your PC-BSD system!
If you are connected to the Internet and there are software updates available for your system, you’ll receive an informational message on your screen.


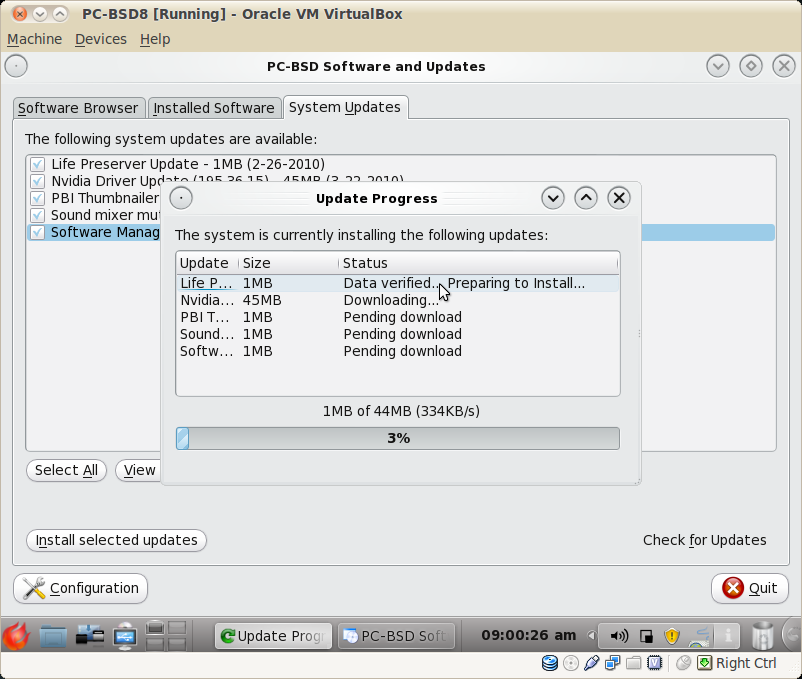
The same procedure must be repeated when you clik on Installed software tab(select the software--one package per time-- and click on Update button)

Advanced Installation
Creating Partitions
By default, the PC-BSD installer assumes that you want to either replace the existing operating system on the computer or that you have an extra partition that you can install into. If you want to keep your existing operating system and it is currently installed into the only partition on your computer, you will need to shrink that partition to create some free space that can be used to install PC-BSD.
The PC-BSD installer will not resize a partition, meaning that you will have to use another application for this purpose.
Caution Always back up your data before resizing a partition, just in case!What utility you use depends on your current operating system:
- Vista: Use the Disk Management utility and the instructions from http://windows.microsoft.com/en-US/windows-vista/Can-I-repartition-my-hard-disk.
- Mac OS X: Use the Disk Utility and the instructions at www.makemacwork.com/resize-disk-partitions.htm.
# sudo apt-get install gparted
# sudo gparted
You can also use the Parted Magic CD, introduced in the “Determining Hardware Settings” section, to create free space.
- This time, boot with the Parted Magic CD and wait for it to load its graphical environment.
- You can then click the Partition Editor icon on the desktop to display your current partition information. I.e if the computer in this example is currently
running Ubuntu, which has been installed onto the entire hard drive. Ubuntu has created one large partition (71.64GB), plus a small extended partition (2.89GB), plus a small swap partition (2GB). - Right-click the partition you want to resize and select Resize/Move from the menu. Input the amount of free space you want to create at the end of the existing partition. Remember, this must be at least 10GB (10000MiB) and should be larger if you will be saving a lot of large files in PC-BSD. I.e, free space of 20GB was created by inputting 20000 and then clicking in the New Size input box.
- The new partition will show as unallocated after you click the Resize/Move button.
- To save your changes, click the Apply button. A message will ask, “Are you are sure you want to apply the pending operations?” Click Apply and wait for the application to indicate that all operations were successful. Depending on the size of the drive, this will take a few minutes.
- After the free space is available, it needs to be turned into a partition. To do so, click Partition ➤New .The default settings are fine, because they will use all of the free space and create a primary partition (which is necessary for an installation). The filesystem is only temporary because it will be overwritten by the PC-BSD installer. If you want, add a descriptive label. Click Add and then Apply.
- Once finished, you can close Partition Editor and click the icon in the lower-left corner to log out.
Booting Multiple Operating Systems
If you selected to install the PC-BSD boot loader, it will provide a simple menu at boot time that probes the type of filesystems (hence, operating systems) installed on the computer. To continue the example seen in the previous section, the PC-BSD boot loader menu looks like this:
F1 LinuxF1 is the first partition containing Ubuntu. F2 was the small partition created by Ubuntu. F3 is the PC-BSD installation. F6 indicates that this computer’s network card supports booting over a network(Thin Client Server).
F2 ?
F3 FreeBSD
F6 PXE
Boot: F1
The value after Boot indicates which operating system will boot if you don’t make a selection. To make a selection, use the key on your keyboard that matches the menu selection; for example, to boot PC-BSD, use the F3 key.
Although PC-BSD will properly probe the partitions, it may or may not be able to load each of the listed operating systems.
Whether an operating system boots depends on which bootloaders those operating systems expect to be loaded from and where their boot info has been written to disk.In this example, Ubuntu should boot by typing F1, but it does not because of the way its boot code is currently installed. The next section will show how to fix this.
You should test each operating system in your PC-BSD boot menu to see whether it boots. You may find that each operating system boots, but you would like to try an alternate (different-looking) boot manager. If this is the case, see the upcoming “Using the GAG Boot Loader” section.
If You Prefer GRUB
Many Linux operating systems, including Ubuntu, use the GNU Grand Unified Bootloader (GRUB) boot loader. If you prefer the GRUB boot loader to the PC-BSD boot loader, or if the PC-BSD boot loader won’t boot your Linux operating system, you will need to run the GRUB utility. Insert your Linux DVD and select to boot into its live DVD. If your Linux DVD does not have a live DVD option, you can still use a live CD such as Knoppix. We will continue with our Ubuntu example.
To boot into the live version of Ubuntu, insert the Ubuntu DVD and select Try Ubuntu Without Any Change to Your Computer from the menu. After the live DVD has loaded, click Applications ➤ Accessories ➤ Terminal and type the following commands:
# sudo grub[sudo password for dru:
Probing devices to guess BIOS drives. This may take a long time.
   [ Minimal BASH-like line editing is supported. For
   the first word, TAB lists possible command
   completions. Anywhere else TAB lists the possible
   completions of a device/filename. ]
grub> root (hd0, (press tab to see menu)
  Possible partitions are:
     Partition num: 0, filesystem type is ext2fs, partition type 0x83
     Partition num: 2,[BSD sub-partitions immediately follow]
        BSD Partition num: 'a', Filesystem type unknown, partition type 0xa5
       BSD Partition num: 'b', Filesystem type unknown, partition type 0xa5
       BSD Partition num: 'd', Filesystem type unknown, partition type 0xa5
       BSD Partition num: 'e', Filesystem type unknown, partition type 0xa5
    Partition num: 4, filesystem type unknown, partition type 0x82
In our example, Ubuntu is in partition 0, PC-BSD is in partition 2, and partition 4 is the SWAP filesystem. Because we want Ubuntu to boot from GRUB, we want to select and set up the 0 partition, which contains Ubuntu:
grub> root (hd0,0)
grub> setup (hd0)
   Checking if "/boot/grub/stage1" exists... yes
   Checking if "/boot/grub/stage2" exists... yes
   Checking if "/boot/grub/e2fs_stage1_5" exists... yes
   Running "embed /boot/grub/e2fs_stage1_5 (hd0)"... 16 sectors are embedded.
Succeeded
   Running "install /boot/grub/stage1 (hd0) (hd0)1+16 p (hd0,0)/boot/grub/stage2
   /boot/grub/menu.1st"... succeeded
Done.
grub> quit
GRUB is now configured to replace the PC-BSD boot loader menu and properly load Ubuntu.
However, don’t reboot yet, because you still have to tell GRUB about PC-BSD. Continue on to the next section to add PC-BSD to the GRUB boot menu.
If You Need to Add PC-BSD to GRUB
In order to add PC-BSD to your current GRUB boot menu, you’ll first need to determine what version of GRUB you are using:
# grub - -version
grub (GNU GRUB 0.97)
Next, add an entry for PC-BSD to the GRUB menu list. This command will open that file in a graphical editor:
# sudo gedit /boot/grub/menu.lst
You should see your existing Ubuntu entries toward the end of the file (If this file is empty, check for errors in the commands mentioned in the previous section).
If the operating system is using a version of GRUB less than 2, as seen in our example, add the following lines after the last menu entry:
title PC-BSD 8If the operating system is using a version of GRUB 2 or higher, add these lines instead:
rootnoverify (hd0,2)
chainloader +1
boot
title PC-BSD 8Reboot the computer and press Esc when you see the GRUB boot loader message. You should now be able to boot into either Ubuntu or PC-BSD.
root (hd0,2,a)
kernel /boot/loader
boot
If You Want to Replace GRUB
Before adding another boot loader, you need to make sure that a boot sector is written to the Linux partition. To do so, find the device name for your Linux partition by running this command while booted into Linux:
# sudo fdisk -lu | grep Linux/dev/sda1    63     109274129 54637033+ 83  Linux
/dev/sda5 150239943 156296384 3028221   82  Linux swap / Solaris
In our example, Ubuntu Linux is installed on /dev/sda1. To make sure boot code is written on that device, use the following:
# sudo grub-install /dev/sda1
Searching for GRUB installation directory ... found: /boot/grub
Installation finished. No error reported.
This is the contents of the device map /boot/grub/device.map.
Check if this is correct or not. If any of the lines is incorrect,
fix it and re-run the script 'grub-install'.
(hd0) /dev/sda
Caution If you don’t install boot code on the Linux partition before installing another boot loader, you may not be able to boot your Linux installation!
Using the GAG Boot Loader
There are other boot loaders available that are easier to configure than the PC-BSD or GRUB boot loaders. We recommend the Graphical Boot Manager (GAG), which can boot up to nine operating systems. It is easy to use(screenshots are available here) .
Caution If you are replacing GRUB with GAG, make sure that you follow the instructions in the “If You Want to Replace GRUB” section before installing GAG!
- Download GAG, unzip the download, and burn the file named cdrom.iso to a CD.
- Boot from the CD, which will bring up a menu of options:1:Read instructions, 2:Read FAQ, 3:Read license, 4:Install GAG, 5:Uninstall GAG (Restores MBR)
- Press 4 to install GAG.
- Select your keyboard from the keyboard type screen and
- your language from the language screen.
- In the next screen, press S to set up GAG, and then press A to add your first operating system to the boot menu. Continuing our example, GAG shows the following partitions:
Key Partition typeIn this example,
A Boot from floppy
B 83h Linux EXT2
C A5h FreeBSD
D 82h
- Ubuntu is probed as B, and PC-BSD as C.
- I’ll press B and type in a description of Ubuntu.
- GAG will then give an option to enter a password. If a password is entered, it will be needed before GAG will boot Ubuntu.
- If I just press Enter, GAG won’t require a password.
- GAG will then provide a menu of icons to go with the entry. I’ll select D to choose the Tux penguin.
- I’ll then press A to add the second operating system,
- press C to select FreeBSD, type in PC-BSD 8 for the description, add no password, and
- press F to select the Beastie icon.
- When you have finished adding all of your operating systems, press H to save your changes to the hard disk.
- You should receive a GAG Installed Successfully message.
- Press R to return to the main menu, and your entries should now show in the boot menu.
- Remove the CD, and reboot the computer to test that you can boot into each of the operating systems.
Resources
- The Definitive Guide to PC-BSD(2010 Apress) by Dru Lavigne ISBN: 978-1-4302-2642-0
No comments:
Post a Comment