1. Ubuntu Linux Secrets
2009 By Richard Blum
ISBN: 978-0-470-39508-0
2. Ubuntu Unleashed
2006 By Andrew Hudson, Paul Hudson
ISBN-10: 0-672-32909-3
3. Ubuntu Hacks
2006 By Bill Childers, Jonathan Oxer, Kyle Ranki
Print ISBN-10: 0-596-52720-9
The X Windows System
The
X environment is unique from the known Windows operating systems in that X is actually a server that provides graphical displays across platforms, even across networks. This makes the X environment very powerful because using a client/server model allows for platform independence and network transportability. This client/server approach is a little different from the commonly known Windows environment; Basically,
the X server portion provides the necessary software to control the graphical and input hardware. The client application then tells the server what to display. The underlying engine of X11 is the
X protocol, which provides a system of managing displays on local and remote desktops. The protocol uses a client/server model that allows an abstraction of the drawing of client windows and other decorations locally and over a network. An X server draws client windows, dialog boxes, and buttons that are specific to the local hardware and in response to client requests. The client, however, does not have to be specific to the local hardware.
This means that system administrators can set up a network with a large server and clients and enable users to view and use those clients on workstations with totally different CPUs and graphics displays. 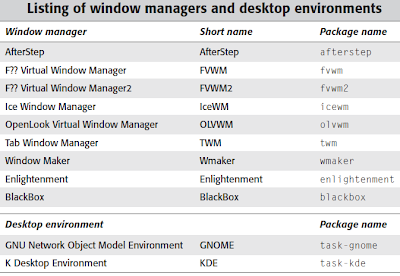
The X client does nothing to directly display the information, so a standard must be set. X defines that standard so that any X client can communicate with any X server by giving it certain display commands. The X server does the actual work of displaying the information. In this way, a client can display its information on any other platform. The only thing that other platform needs is an X server. Using this client/server model lets the actual client application be platform-independent. This means that the client application can display itself on any platform architecture for which an X server is available. For instance, in a mixed environment where you have Linux running on Intel-based PC, Mac, and SPARC platforms, a client from the Intel-based PC can run on either the Mac or the SPARC workstation. The reverse is also true; the Intel-based platform can just as easily display applications from the other platforms. In the previous scenario, a network links these different platforms together. As long as you have two or more computers connected to a network, they can share applications. Granted you have some security issues to consider, but the basic principle remains—the application runs as if it were local to the workstation. All in all, this type of structure allows for an enormous amount of flexibility when creating applications.
Although the X server sets the standard for displaying information, it does not specify a policy for interacting with the user; that is the job of other components that make up the GUI: the window manager and the desktop environment.
If you have an older, slower system with limited resources, then you might want to consider not using a GUI because it can drastically slow down your performance. Also, if you use the system as a server, you can leave more room for the other server applications., there (even for security reasons) is no real need to have a GUI installed.
To help determine the load of a window manager on your system, use a performance meter such as xload in the x11-apps Ubuntu package to gather resource information for comparing them. Most window managers include some type of performance meter. Because the meter itself consumes resources, you can’t take it as gospel as to the resources used by the interface. However, it can give you a point of reference to compare different resources.
Because X offers users a form of distributed processing, this means that Ubuntu can be used as a very cheap desktop platform for clients that connect to a powerful X server. The more powerful the X server, the larger the number of X-based clients that can be accommodated.
This functionality can breathe new life into older hardware, pushing most of the graphical processing on to the server.
A fast network is a must if you intend to run many X clients because X can become bandwidth-hungry. X is hugely popular in the UNIX and Linux world for a variety of reasons. The fact that it supports nearly every hardware graphics system is a strong point, as well as strong multiplatform programming standards give it a solid foundation of developers committed to X. Another key benefit of X is its networking capability, which plays a central point in administration of many desktops and
can also assist in the deployment of a thin-client computing environment. Being able to launch applications on remote desktops and also standardize installations serve to highlight the versatility of this powerful application. More recent versions of X have also included support for shaped windows (that is, non-rectangular), graphical login managers (also known as display managers), and compressed fonts. Each release of X brings more features designed to enhance the user experience, including being able to customize how X client applications appear, right down to buttons and windows. Having applications launch from a single location makes the lives of system administrators a lot easier because they have to work on only one machine, rather than several.
X in Ubuntu
If you run the Ubuntu server, or if you run your Ubuntu workstation in text mode, there’s not much involved for Ubuntu to interact with the video card and monitor.
By default Ubuntu can use just about any video card and monitor in text mode to display 25 lines of 80-column text. This feature is built into the Ubuntu Linux software so that it can directly send text to the monitor at all times. However, when you use the graphical mode on your workstation, things are a bit different. Instead of directly sending text to the monitor, Ubuntu must be able to draw lines, shade colors, and manipulate images. To do that, Ubuntu makes use of a special type of
software called X Windows to interface with the video card and monitor. Two basic elements control the video environment on your workstation:
- The PC video card
- The monitor
The Ubuntu operating system must interact with the video card in your PC to produce the graphical images for your desktop to appear and to run graphical applications. The video card controls how to draw the images on the monitor display, what colors are available to use, what size of display area you can use, and at what speed the system can draw the images. The video card must be able to interact with the monitor to display the images sent by Ubuntu. There’s wide choice of monitors available these days, with a wide variety of features, from standard old-style, cathod-tube monitors to modern flat-screen plasma monitors. The combination of the video card features and monitor features determines the graphics capabilities of your workstation. Ubuntu needs to know how to use and exploit these features to produce the best possible graphics for the desktop and applications. Given the wide variety of video cards and monitors available, it would be difficult for the GNOME desktop developers to have to code the features found in GNOME for every possible video card and monitor environment available. Instead, the X Windows software helps do that.

The X Windows software operates as an intermediary between the Ubuntu system and the input and output devices connected to the workstation. It’s responsible for controlling the graphical environment so that GNOME doesn’t have to support different types of video cards and monitors. Instead, the X Windows software handles all of that, and the GNOME software has to interact with just the X Windows software to display images on any type of video card and monitor combination. Besides dealing with the video card and monitor, X Windows also handles any input devices attached to the workstation, such as the keyboard and mouse. It’s the main clearinghouse for all interaction for the desktop environment. Figure 16-1 shows a typical X
Windows system.
Because the X Windows software handles all of the input and output functions for the Ubuntu workstation, it’s important to ensure that the X Windows software is working properly. It must know the type of input and output devices it’s communicating with so that you can interact with your desktop. The X Windows software is actually a specification of how to interact in a client /server methodology, serving the input and output devices to Ubuntu applications. Two popular X Windows implementations are currently available in the Linux world.
Linux X Windows SoftwareOver the years, two X Windows software packages have emerged in the Linux world:
- XFree86 For a long time, the XFree86 software package was the only X Windows package available for Linux. As its name implies, it’s a free, open-source version of the X Windows software intended for the x86 computer platform. Unfortunately, XFree86 is notorious for being extremely hard to configure and get working properly. It uses a cryptic configuration file to define the input and output device settings on the system, which is often confusing to follow. Having the wrong values set for a device could render your workstation useless! However, because XFree86 was once the only way to produce graphical windows on Linux PCs, it was necessary to learn how to use it. As time progressed, several attempts to automate the XFree86 configuration were made. Many Linux distributions used a user -interactive method of automatically generating the XFree86 configuration file. Several dialog boxes would appear during installation, prompting the installer to select the video card and monitor setup from a list. The responses were then used to generate a configuration file. There were also attempts at trying to automatically detect video card, monitor, keyboard, and mouse settings. Some of these attempts were better than others. These efforts, though, did eventually lead to another X Windows software package.
- X.Org More recently, a package called X.Org has come onto the Linux scene. It too provides an open-source software implementation of the X Windows system, but in a much more user-friendly way. It uses a combination of scripts and utilities to attempt to automatically detect the core input and output devices on a workstation, then creates the configuration file based on its findings. X.Org is becoming increasingly popular, and many Linux distributions are starting to use it instead of the older XFree86 system. Ubuntu uses the X.Org package to produce the graphical X Windows you see for your desktop. When you install Ubuntu, it goes through a series of steps to detect the input and output devices on your workstation (see Chapter 3, “Installing Ubuntu”). During the installation you may notice a time when it scans your video card and monitor for supported video modes. Sometimes this causes your monitor to go blank for a few seconds. Because there are many types of video cards and monitors out there, this process can take a little while to complete. Unfortunately, sometimes Ubuntu can’t autodetect what video settings to use, especially
with some of the newer, more complicated video cards. If this happens, Ubuntu reverts to
a default, safe X.Org configuration. The safe configuration assumes a generic video card and monitor and usually will produce a graphical desktop, although not at the highest resolution possible on your system. If this happens in your installation, don’t worry. Usually you can use the System>Preferences>Screen Resolution(now on Display) utility to set the proper video mode for your setup. If all else fails, you can manually enter the settings in the X.Org configuration file.
X11R7 is the X server that is used with Ubuntu. The base Xorg distribution consists of 30 RPM packages (almost 120MB), which contain the server, along with support and development libraries, fonts, various clients, and documentation. An additional 1,000 or more X clients, fonts, and documentation are also included with Ubuntu.
Note :A full installation of X and related X11R7 files can consume more usually much more than 170MB of hard drive space. This is because additional clients, configuration files, and graphics (such as icons) are under the /usr/bin and /usr/share directory trees. You can pare excessive disk requirements by judiciously choosing which X-related packages (such as games) to install on workstations. However today, the size requirements are rarely a problem, except in configuring thin-client desktops or embedded systems.
The /usr directory and its subdirectories contain the majority of Xorg's software. Some important subdirectories are:
- /usr/X11R6 contains a link to /usr/bin who'is the location of the X server and various X clients. (Note that not all X clients require active X sessions.)
- /usr/include This is the path to the files necessary for developing X clients and graphics such as icons.
- /usr/lib This directory contains required software libraries to support the X server and clients.
- /usr/lib/X11 This directory contains fonts, default client resources, system resources, documentation, and other files that are used during X sessions and for various X clients. You will also find a symbolic link to this directory, named X11, under the /usr/lib directory.
- /usr/lib/xorg/modules This path links to drivers and the X server modules used by the X server enables use of various graphics cards.
- /usr/X11/man This directory contains directories of man pages for X11 programming and clients
The main components required for an active local X session is installed on your system if you choose to use a graphical desktop. These components are the X server, miscellaneous fonts, a
terminal client (that is, a program that provides access to a shell prompt), and a client known as a window manager. Window managers administer on screen displays, including overlapping and tiling windows, command buttons, title bars, and other on screen decorations and features.
The X.Org Configuration (xorg.conf)The core of the
X.Org configuration is the xorg.conf configuration file, located in the
/etc/X11 folder. This configuration file contains all of the settings detected by X.Org when you installed Ubuntu. Should you need to change resolution or refresh frequency post-install, you should use the
gnome-display-properties application. Information relating to hardware, monitors, graphics cards, and input devices is stored in the
xorg.conf file, so be careful if you decide to tinker with it in a text editor!
The
xorg.conf configuration file contains several sections, each defining a different element of the input and output system. Each section itself may contain one or more subsections that further define the input or output device. The basic format of a section looks like this:
# Comment for a section
Section “Name”
EntryName EntryValue
…
…
Subsection “Subname”
EntryName EntryValue
…
…
EndSubsection
EndSection
The section and subsection areas consist of a name/value pair that defines a setting for the device, such as the type of mouse or the available viewing modes of a monitor.
Defining SectionsThe components, or sections, of the xorg.conf file specify the
X session or server layout, along with pathnames for files that are used by the server, any options relating directly to the server, any optional support modules needed, information relating to the mouse and keyboard attached to the system, the graphics card installed, the monitor in use, and of course the resolution and color depth that Ubuntu uses. (the xorg.conf man page contains full documentation of all the options and other keywords you can use to customize your desktop settings.) Of the 12 sections of the file, these Nine are the essential components:
- Device: Describes the characteristics of one or more graphics cards and specifies what optional (if any) features to enable or disable.
- DRI: Includes information about the Direct Rendering Infrastructure, which contains the hardware acceleration features found in many video cards.
- Files: Lists pathnames of font files along with the file containing the color database used for the display, the location fonts, or port number of the font server.
- InputDevice: Lists information about the keyboard and mouse or other pointing devices such as trackballs, touchpads, or tablets.; multiple devices can be used.
- Module: Defines X server extension modules and font modules to load.
- Monitor: Lists the monitor specifications(capabilities of any attached display); multiple monitors can be used.
- ServerFlags: Lists X server options for controlling features of the X Windows environment.
- ServerLayout: Combines one or more InputDevice and Screen sections to create a layout for an X Windows environment. Defines the display, defines one or more screen layouts, and names input devices.
- Screen: Defines a video card and monitor combination used by the X server. Defines one or more resolutions, color depths, perhaps a default color depth, and other settings.
The sections appear on an as-needed basis. That is, you’ll only see the sections defined in the X.Org configuration file that are actually used to describe devices on your workstation. Thus, if you don’t have any special font or color files defined, you won’t see a Files section in the configuration file on your Ubuntu workstation.
Example ConfigurationTo demonstrate the X.Org configuration file layout, let’s take a look at an example configuration
file from an Ubuntu workstation.
Section “InputDevice”
Identifier “Generic Keyboard”
Driver “kbd”
Option “XkbRules” “xorg”
Option “XkbModel” “pc105”
Option “XkbLayout” “us”
EndSection

Section “InputDevice”
Identifier “Configured Mouse”
Driver “mouse”
Option “CorePointer”
EndSection

Section “InputDevice”
Identifier “Synaptics Touchpad”
Driver “synaptics”
Option “SendCoreEvents” “true”
Option “Device” “/dev/psaux”
Option “Protocol” “auto-dev”
Option “HorizEdgeScroll” “0”
EndSection

Section “Device”
Identifier “Configured Video Device”
EndSection

Section “Monitor”
Identifier “Configured Monitor”
EndSection

Section “Screen”
Identifier “Default Screen”
Monitor “Configured Monitor”
Device “Configured Video Device”
EndSection

Section “ServerLayout”
Identifier “Default Layout”
Screen “Default Screen”
InputDevice “Synaptics Touchpad”
EndSection
This configuration file defines several sections for input and output devices.
- The first section defines an InputDevice—specifically, a standard U.S. 105-key keyboard as the input device. The Identifier entry for the device, Generic Keyboard, declares a name for the device. The driver that X.Org uses to manage the device is defined using the Driver entry. After that, the section includes a few options that define specific characteristics for the keyboard device.
- The second section also defines an InputDevice, but in this instance it defines a standard mouse, using a standard mouse driver and no additional options.
- In the next section, you see yet another definition for an InputDevice, but this one defines a touchpad mouse used on a laptop. The touchpad uses a generic Synaptics driver to interact with the touchpad and defines a few options to control how the touchpad operates.
- You can configure multiple devices, and there might be multiple InputDevice sections. After the three InputDevice sections, the next three sections(Device, Monitor, Screen) define the video environment for the workstation.You may notice something odd about the device and monitor sections that are defined in the configuration file. The configuration file doesn’t contain any drivers or settings for the video card device or the monitor. This X.Org feature is relatively new. When a device appears in the configuration file without any settings, it forces the X.Org software to automatically attempt to detect the device each time you start a new X Windows session. Ubuntu started using this method in version 8.04 to help facilitate adding new video card and monitor features after installation. By automatically detecting the video environment each time the system starts, Ubuntu can detect when you install new hardware. The time necessary to autodetect the new hardware isn’t very significant, so the performance penalty of redetecting hardware is small, relative to the benefit of automatically detecting new hardware. The Screen section in the configuration file ties the monitor and video card together into a single device for X.Org. Using this configuration, X.Org knows which video card and monitor are paired. Although this feature is somewhat trivial in a single monitor situation, if you have dual monitors and dual video cards, it’s a must.
If X.Org is unable to detect your video card and monitor (or incorrectly detects them), you can manually enter the settings in the xorg.conf file. When X.Org detects manual settings for a device, it doesn’t attempt to automatically detect the device; it uses the predefined values instead. For video cards, you’ll need to enter the name of the video card driver used to control the video card, plus any additional required options to define the video card settings. Here’s an example of a manual video card entry (The same applies to monitors.If you’re using a special video card or monitor, the manufacturer often will provide the necessary X Windows driver and configuration settings required for it ) in the xorg.conf configuration file. Once you’ve defined the video card and monitor, you must define a Screen section to link the two devices, plus define features for the screen :
Section “Device”
Identifier “Videocard0”
Driver “nv”
VendorName “Videocard vendor”
BoardName “nVidia GeForce 2 Go”
EndSection
Section “Monitor”
Identifier “Monitor0”
Vendorname “Monitor Vendor”
ModelName “HP G72”
DisplaySize 320 240
HorizSync 30.0 - 85.0
VertRefresh 50.0 - 160.0
Option “dpms”
EndSection
Section “Screen”
Identifier “Screen0”
Device “Videocard0”
Monitor “Monitor0”
DefaultDepth 24

Subsection “Display”
Viewport 0 0
Depth 16
Modes “1024x768” “800x600” “640x480”
EndSubSection

SubSection "Display"
Depth 8
Modes  "1024x768” “800x600” “640x480”
EndSubSection

EndSection
- The Monitor Section: The Monitor section configures the designated display device as declared in the ServerLayout section. Note that the X server automatically determines the best video timings according to the horizontal and vertical sync and refresh values in this section. If required, old-style modeline entries (used by distributions and servers prior to XFree86 4.0) might still be used. If the monitor is automatically detected when you configure X, its definition and capabilities are inserted in your xorg.conf file from the MonitorsDB database. This database contains more than 600 monitors and is located in the /usr/share/hwdata directory.
- The Device Section The Device section provides details about the video graphics chipset used by the computer. The Driver entry tells the Xorg server to load the nv_drv.o module from the /usr/lib/xorg/modules/drivers directory. Different chipsets have different options.The Xorg server supports hundreds of different video chipsets. If you configure X11 but subsequently change the installed video card, you need to edit the existing Device section or generate a new xorg.conf file, using one of the X configuration tools, to reflect the new card's capabilities. You can find details about options for some chipsets in a companion man page or in a README file under the /usr/lib/X11/doc directory. You should look at these sources for hints about optimizations and troubleshooting. However, this should be fairly rare as Ubuntu sports a comprehensive hardware detection system, automatically adjusting settings to take account of newly installed hardware.
- The Screen Section: The Screen section ties together the information from the previous sections (using the Screen0, Device, and Monitor Identifier entries). It can also specify one or more color depths and resolutions for the session. In this example a color depth of millions of colors and a resolution of 1024x768 is the default, with optional resolutions of 800x600, and 640x480. Multiple Display subsection entries with different color depths and resolutions (with settings such as Depth 16 for thousands of colors) can be used if supported by the graphics card and monitor combination. You can also use a DefaultDepth entry (which is 24, or millions of colors, in the example), along with a specific color depth to standardize display depths in installations. You can also specify a desktop resolution larger than that supported by the hardware in your monitor or notebook display. This setting is known as a virtual resolution in the Display subsection. This allows, for example, an 800x600 display to pan (that is, slide around inside) a virtual window of 1024x768.
- Note : If your monitor and graphics card support multiple resolutions and the settings are properly configured, you can use the key combination of Ctrl+Alt+Keypad+ or Ctrl+Alt+Keypad- to change resolutions on the fly during your X session.
In particular iff your computer is a laptop with a touchpad, it may have several
InputDevice entries, so make sure you find the one that refers to your mouse. If it was configured automatically by
Xorg, it will probably look something like this:
Section "InputDevice"
    Identifier   "Configured Mouse"
    Driver        "mouse"
    Option        "CorePointer"
    Option        "Device" "/dev/input/mice"
    Option        "Protocol" "ImPS/2"
    Option        "ZAxisMapping" "4 5"
    Option        "Emulate3Buttons" "true"
EndSection
Start by changing the Protocol value. The
ExplorerPS/2 driver supports more devices than the older
ImPS/2 driver, so substitute this line:
Option "Protocol" "ExplorerPS/2"
Since your multi-button mouse almost certainly has a middle button, you don't need the
Emulate3Buttons option anymore, so delete it. Unfortunately, there is no way for your computer to automatically determine the number of buttons available on a mouse, so you need to add an option that explicitly tells Xorg how many it has. It's obvious that you need to count all the actual physical buttons on the mouse,
but remember that you usually need to add three more: one for clicking the scroll wheel, one for scroll-up, and one for scroll-down. A typical scroll mouse with two main buttons on the top, two on the side, and a scroll wheel actually has seven buttons as far as the driver is concerned, so add a line like this:
Option "Buttons" "7"
Next, map the action of the scroll wheel to virtual buttons using the
ZAxisMapping option. In the case of a simple scroll wheel that moves only up or down, you can assign two values, which are associated with negative (down) and positive (up) motion, respectively:
Option "ZAxisMapping" "4 5"
Some mice have a scroll wheel that also rocks from side to side, and some even have two scroll wheels, in which case you can add mappings for negative and positive motion in the second axis:
Option "ZAxisMapping" "4 5 6 7"
Unfortunately, you may find the second scroll direction isn't recognized by Xorg at all because there is currently no standard for defining how mice should encode horizontal scroll data when it's transmitted to the driver. Even if it is recognized, you may find the rocker or second scroll wheel moves in the opposite direction to what you expect, so you may need to reverse the third and fourth values.
Some browsers such as Firefox are hardcoded to use buttons 4 and 5 as shortcuts for "back" and "forward," but because some wheel mice report wheel-up and wheel-down as the fourth and fifth button events, respectively, you may need to do some extra work to use the side buttons as back and forward. You can remap the reported button events by calling
xmodmap:
$xmodmap -e "pointer = 1 2 3 6 7 4 5"
The
xmodmap command will need to be run each time you log in to GNOME, so go to
System>Preferences>Sessions>Startup Programs and put in the whole line; then compensate for the offset button values by using a modified
ZAxisMapping line in
/etc/X11/xorg.conf:
Option "ZAxisMapping" "6 7"
One final option you can configure is
mouse resolution. Many multi-button gaming mice run at very high resolutions to enable accurate targeting, but you may find that it throws off Xorg's response curve. In that case, it may help to add a
Resolution option in
dpi (dots per inch):
Option "Resolution" "2400"
Once you have made all of these changes, your mouse configuration will look something like this:
Section "InputDevice"
    Identifier   "Configured Mouse"
    Driver       "mouse"
    Option       "CorePointer"
    Option       "Device" "/dev/input/mice"
    Option       "Protocol" "ExplorerPS/2"
    Option       "Buttons" "7"
    Option       "ZAxisMapping" "4 5"
EndSection
To apply changes, you need to restart Xorg. The easiest way to do so is to
log out of your current session and then press
Ctrl-Alt-Backspace, which will kill Xorg and force GDM to restart it (if GDM doesn't restart it, log in at the console and run the command):
$sudo /etc/init.d/gdm restart
Log back in and launch
xev, the
X EVent reporter, and click each button and scroll the scroll wheel in both directions. Each event will cause a button number to be reported in the terminal. If everything went as planned, each button will report a different button number.
Configuring XAlthough the Ubuntu installer can be relied upon to configure X during installation, problems can arise if the PC's video card is not recognized. If you do not get the graphical login that should come up when you reboot after installation, then you will have to do some configuration by hand in order to get X working.
Note that some installs, such as for servers, do not require that X be configured for use to support active X sessions, but might require installation of X and related software to support remote users and clients.
You can use the following configuration tools, among others, to create a working xorg.conf file:
The following sections discuss how to use each of these software tools to create a working xorg.conf file.
Starting XYou can start X sessions in a variety of ways.
- The Ubuntu installer sets up the system initialization table /etc/inittab to have Linux boot directly to an X session using a display manager (that is, an X client that provides a graphical login). After you log in, you use:
- a local session (running on your computer)
- or, if the system is properly configured, an X session running on a remote computer on the network.
Logging in via a display manager requires you to enter a username and password.
- You can also start X sessions from the command line. The following sections describe these two methods.
Using a Display ManagerAn X display manager presents a graphical login that requires a username and password to be entered before access is granted to the X desktop. It also allows you to choose a different desktop for your X session. Whether or not an X display manager is presented after you boot Linux is controlled by a runlevel a system state entry in
/etc/inittab. The following runlevels are defined in the file:
# Runlevel 0 is halt.
# Runlevel 1 is single-user.
# Runlevels 2-5 are multi-user.
# Runlevel 6 is reboot.
Runlevels 2-5 are used for multiuser mode with a graphical X login via a display manager;
booting to runlevel 1 provides a single-user, or text-based, login. The init default setting in the
/etc/inittab file determines the default runlevel:
id:2:initdefault:
In this example, Linux boots and then runs X.
Configuring gdm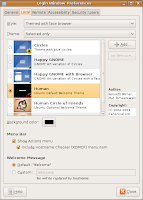
The
gdm display manager is part of the GNOME library and client distribution included with Ubuntu and provides a graphical login when a system boots directly to X. Its login (which is actually displayed by the
gdmlogin client) hosts pop-up menus of window managers, languages, and system options for shutting down (halting) or rebooting the workstation. Although you can edit (as root)
gdm.conf under the
/etc/gdm directory to configure gdm, a much better way to configure GNOME's display manager is to use the
gdmsetup client. You can use the
gdmsetup client to configure many aspects and features of the login display. You launch this client from the GNOME desktop panel's
System> Administration>Login Window menu item, or from the command line, like this:
$ gksudo gdmsetup &
After you press Enter, you see the
GDM Setup window, as shown in Figure above. You can specify settings for security, remote network logins, the X server, and session and session chooser setup by clicking on the tabs in the GDM Setup dialog.
Configuring kdmThe kdm client, which is part of the
KDE desktop suite, offers a graphical login similar to gdm. You configure kdm by running the
KDE Control Center client (kcontrol), as the root operator, by clicking the
Control Center menu item from the
KDE kicker or desktop panel menu. You can also start
KDE Control Center by using the
kcontrol client at the command line like so:
$ kcontrol &
In the
Index tab of the left pane of the
KDE Control Center window, you click the S
ystem Administration menu item to open its contents, and then you click the
Login Manager menu item. The right pane of the
Control Center window displays the tabs and configuration options for the
kdm Login Manager. To make any changes to the KDE display manager while logged in as a regular user, you must first click the
Administrator Mode button, and then enter the root operator password. You can click on a tab in the
Control Center dialog to set configuration options. Options in these tabs allow you to control the
login display, prompts, user icons, session management, and configuration of system options (for shutting down or rebooting). After you make your configuration choices in each tab, click the Apply button to apply the changes immediately; otherwise, the changes are applied when the X server restarts. Using the xdm Display ManagerThe xdm display manager is part of the Xorg distribution and offers a bare-bones login for using X. Although it is possible to configure xdm by editing various files under the
/etc/X11/xdm directory,
GNOME and KDE offer a greater variety of options in display manager settings. The default xdm login screen's display is handled by the
xsetroot client, which is included with Xorg, and Owen Taylor's
xsri client, as specified in the file
Xsetup_0 in the xdm directory under /etc/X11.
The xsri client can be used to set the background color of the login display's desktop and to place an image in the initial display. Starting X from the Console by Using startxIf you have Ubuntu set to boot to runlevel 1, a text-based console login, you can start an X session from the command line. You use the
startx command (which is actually a shell script) to do so. You launch the X server and an X session by using startx, like this:
$ startx
startx first looks in your home directory for a file named
.xinitrc. This file can contain settings that will launch an alternative desktop and X clients for your X session. The default system .xinitrc is found in the
/etc/X11/xinit directory, but a local file can be used instead to customize an X session and launch default clients. For example, you can download and install the
mlvwm window manager, which is available from in the
/usr/local/bin directory. You can then use the mlvwm desktop for your X session along the
xterm terminal client by creating an .xinitrc file that contains the following:
xterm & exec /usr/bin/mlvwm
Using a custom .xinitrc is not necessary if you're using Ubuntu's desktop, which runs X and either a GNOME-aware window manager or KDE as a desktop environment.
You can also use the startx command with one or more command-line options.
These options are passed to the X server before it launches an X session. For example, you can use startx to specify a color depth for an X session by using the
-depth option, followed by a number such as 8, 16, 24, or 32 for 256, thousands, or millions of colors (as defined in the X configuration file and if supported).
Using different color depths can be useful during development for testing how X clients look on different displays, or to conserve use of video memory, such as when trying to get the highest resolution (increased color depth can sometimes affect the maximum resolution of older video cards). For example, to start a session with thousands of colors, you use the startx command like this:
$ startx -- -depth 16$
Another option that can be passed is a specific
dots-per-inch (dpi) resolution that is to be used for the X session. For example, to use 100 dpi, you use the
-dpi option followed by 100, like this:
$ startx -- -dpi 100
You can also use startx to launch multiple X sessions. This feature is due to Linux support for virtual consoles, or multiple text-based displays. To start the first X session, you use the startx command followed by a display number, or an X server instance (the first is 0, using screen 0) and a number that represents a virtual console.
The default console used for X is number 7, so you can start the session like this:
$ startx -- :0 vt7
After X starts and the window manager appears, you press Ctrl+Alt+F2 and then log in again at the prompt. Next, you start another X session like this, specifying a different display number and virtual console:
$ startx -- :1 vt8
Another X session starts. To jump to the first X session, press
Ctrl+Alt+F7. You use
Ctrl+Alt+F8 to return to the second session. If you exit the current session and go to another text-based login or shell, you use
Alt+F7 or
Alt+F8 to jump to the desired session.
Using startx is a flexible way to launch X sessions, but multiple sessions can be confusing, especially to new users, and
are a horrific resource drain on a system that does not have enough CPU horsepower and memory. A better approach is to use multiple workspaces, also known as virtual desktops.
Selecting and Using Window ManagersA window manager is usually launched immediately after the X server starts. The window manager looks after the general look and feel of the interface, as well as the actual drawing of scrollbars, buttons, and so on.
A window manager is essential to interact with the X server; without one, X client windows would not be able to be moved around or resized. Linux allows for a wide variety of window managers, and each window manager caters for specific requirements. This variety is one of the features that makes Linux and X itself more popular.
A window manager provides the user with a graphical interface to X, as well as a customized desktop which includes the look and feel of the window manager.
- Things such as icons, panels, windows, grab handles, and scroll bars are defined by the window manager's general settings and are usually unique to that window manager.
- A window manger might also provide menuing on the root desktop or after a button is clicked in a client's window title bar.
- Some window managers support the use of special keyboard keys to move the pointer and emulate mouse button clicks.
- Another feature is the capability to provide multiple workspaces, or a virtual desktop, which is not the same as the virtual screen; whereas a virtual screen is a desktop that is larger than the display, a virtual desktop offers two, four, or eight additional complete workspaces. Switching between these window managers is fairly simple.
Before you login, click the Options button on the login screen and choose Select Session. You will then be given a list of the installed window managers that are ready for use. You can choose to change your default session to another window manager, or just use it for one session only. Do not worry about losing your favorite window manager to another one. Just change it back again when you next return to the login screen.
The GNOME and KDE Desktop EnvironmentsA desktop environment for X provides one or more window managers and a suite of clients that conform to a standard graphical interface based on a common set of software libraries. When they are used to develop associated clients, these libraries provide graphical consistency for the client windows, menus, buttons, and other onscreen components, along with some common keyboard controls and client dialogs. The following sections briefly discuss the two desktop environments that are included with Ubuntu: GNOME and KDE.
GNOME: The GNU Network Object Model EnvironmentThe GNOME project, which was started in 1997, is the brainchild of programmer whiz
Miguel de Icaza. GNOME provides a complete set of software libraries and clients. GNOME depends on a window manager that is GNOME-aware. This means that to provide a graphical desktop with GNOME elements, the window manager must be written to recognize and use GNOME. Some compliant window managers that are GNOME-aware include
Havoc Pennington's metacity (the default GNOME window manager),
Enlightenment,
Window Maker,
IceWM, and
sawfish.
Ubuntu uses GNOME's user-friendly suite of clients to provide a consistent and user-friendly desktop. GNOME clients are found under the
/usr/bin directory, and GNOME configuration files are stored under the
/etc/gnome and
/usr/share/gnome directories, with user settings stored in the home directory under
.gnome.
gconfeditor client used for setting GNOME configuration options. You can configure your desktop in various ways and by using different menu items under the
Preferences menu. For a comprehensive icon view of preference items, look under the
System menu to find many different tools.
Nautilus, the GNOME file browser, was originally developed by
Eazel (which ceased operations shortly before summer 2001). The Nautilus shell is used for the Ubuntu desktop as a file browser and desktop utility. The Nautilus main window is a hierarchy of sub-directories and files in a home directory.
KDE: The K Desktop EnvironmentKDE, which is included with
Kubuntu, has been available for Linux, Xorg, and XFree86 since 1996. KDE is a graphical desktop environment that offers a huge suite of clients, including a free office suite named
KOffice. KDE clients are located under the
/usr/bin directory, and
nearly all clients have a name that begins with k.
The
.kde directory in your home directory contains custom settings and session information. You can use
KDE's Control Center to customize desktop settings. You can launch this client by clicking the Control Center menu item from KDE's desktop menu (hosted by the panel along the bottom of your desktop, known as the
kicker) or from the command line, like so:
$ kcontrol &
Xfce: The Lightweight AlternativeWith the release of the Ubuntu 6.06 family of distros came another sibling,
Xubuntu. This version is aimed specifically at low specification machines, and uses a very lightweight window manager called
Xfce. Xfce can make use of most of the GNOME applications, thanks to being able to access the
GTK2 libraries that GNOME is built upon. If you like your window manager simple and un-complicated, and GNOME is straining your hardware, then choose XFce.
Ubuntu Video ConfigurationAfter you’ve installed Ubuntu, you can perform a few manual changes to the X Windows system using graphical tools available on the desktop.
The Screen Resolution UtilityThe X.Org environment in Ubuntu is rapidly developing and changing. Further advances and ideas are implemented in each new Ubuntu distribution. Currently, the core utility for configuring your video settings in the Ubuntu desktop is the Display utility (
System ➪Preferences ➪ Display).
In my case appear a dialog box
It appears that your graphics driver does not support the necessary extensions to use this tool. Do you want to use your graphics driver vendor's tool instead?
- If i clik No then The Display dialog box is pretty basic. There are only a few things you can modify here:
- Resolution: Select the screen resolution from a list of supported resolutions for your video card and monitor combination. X.Org automatically detects resolutions that are supported and displays only those resolutions.
- Refresh Rate: Select the screen refresh rate for your monitor.
- Rotation: Set the screen orientation for the monitor. The options are
- • Normal: Display the desktop at the normal orientation for the monitor.
- • Left: Display the desktop using the left side of the monitor as the top of the desktop.
- • Right: Display the desktop using the right side of the monitor as the top of the desktop.
- • Upside Down: Display the desktop using the bottom of the monitor as the top of the desktop.
- Mirror Screens: Create identical desktops on dual monitor setups instead of expanding the desktop to both monitors.
- Detect Displays: Re-scan the video cards and monitors for the workstation.
The Mirror Screens option determines how X.Org handles two or more monitors connected to the workstation. When you select the Mirror Screens check box, X.Org duplicates the desktop on both monitors. However, when you deselect the check box, X.Org separates the two monitors and distributes the desktop layout between them. When you use this feature, more screen areas appear on the Screen Resolution window area, one box for each monitor connected to the workstation.You can drag and drop the different monitors in the window. The location of the monitor determines which part of the expanded desktop it displays. If you set the monitor images side by side, the desktop will expand sideways between the monitors. If you set the monitor images one on top of the other, the desktop will expand vertically between the monitors.
Each monitor image has its own group of settings. Click on a monitor image to view the settings for that monitor. By default, X.Org will set the display resolution of the two monitors to their highest common value.
If you plug a second monitor into a laptop to use as a cloned monitor, make sure that the additional video port on the laptop is enabled in the system BIOS settings. Some laptops disable external video ports when not being used.
Setting Compiz Fusion FeaturesIf your workstation contains an advanced video card, besides the basic video settings available
in the Screen Resolution utility, you can enable advanced visual effects, depending on what your video card supports.Ubuntu uses the
Compiz Fusion software to provide advanced video features for the desktop. The Compiz Fusion software package is an open-source product that combines 3-D desktop features with advanced window management features using plug-ins. Ubuntu includes a generous sampling of plug-ins to provide lots of fancy graphical features for the desktop environment. Ubuntu provides two interfaces you can use to control the Compiz Fusion features enabled on the desktop.
Basic Visual EffectsThe
Appearance Preferences window provides the Visual Effects tab for enabling or disabling the level of animated effects used on the desktop. To get there, select the S
ystem ➪ Preferences ➪ Appearance entry from the Panel menu, then select the
Visual Effects tab. This window provides three generic settings for feature levels:
- None: No Compiz Fusion elements are enabled for the video card.
- Normal: Enables a few basic video elements, such as fading windows, to enhance the desktop look and feel.
- Extra: Enables advanced video features such as wobbly windows when you move a window, animations for windows operations, and extra window decorations to liven up your Ubuntu desktop.
The default setting depends on the capabilities of your video card. For basic video cards with no advanced features, Ubuntu sets this option to None by default. Unless you have a really old video card, you should be able to set this value to the Normal level. If you have an advanced video card in your workstation, try the
Extra setting and see the extra effects in action!
Advanced Visual EffectsThe Visual Effects settings provide a generic way to enable effects on your workstation. If your Ubuntu workstation is connected to the Internet, you can customize the Compiz Fusion visual effects settings by installing the
CompizConfig Settings Manager. This tool allows you to enable and disable individual visual effects to liven up your desktop (if you have an advanced video card). To install the CompizConfig Settings Manager, follow these steps:
- Start the Add/Remove Applications program by selecting Applications ➪ Add/Remove from the Panel menu.
- Select the All section on the left side list and ensure that All Open Source applications is set for the Show drop-down box.
- Type compiz in the search dialog box, then hit the Enter key. The search results will appear in the top application list, with the descriptions appearing below the list.
- Check the box for Advanced Desktop Effects Settings (ccsm).
- Click the Apply Changes button to begin the installation. The Add/Remove Applications program will ask you to confirm your selection, then ask for your password to start the installation.
- Close the Add/Remove Applications window.

Once you’ve installed the CompizConfig Settings Manager, you can access it by selecting
System ➪ Preferences ➪ CompizConfig Settings Manager from the Panel menu.
The visual effects are divided into eight sections, shown in Table 16-1. Each section contains a set of related plug-ins you can enable on your desktop. Each Compiz Fusion plug-in provides a different visual effect feature.
Besides enabling an individual visual effect, you can customize it. Select a plug-in from the list to view and change the settings for the plug-in.
Each plug-in has its own settings panel, which enables you to completely customize your desktop
experience.
Monitor and Video CardsIn the old days of Ubuntu (up to the 7.10 Gutsy Gibbon release), the Screens and Graphics utility was included so that you could manually change the video card and monitor settings for X.Org.
Because the Ubuntu developers are striving for automatic detection of the video environment using the
Screen Resolution(Display) utility, the manual Screens and Graphics utility has been removed from the menu system. However, for the time being it’s still included in the Ubuntu distribution(until 8.10), and you can use it to customize your video environment. First, you need to add the
Screens and Graphics utility to your menu. Follow thesesteps:
- Select System ➪ Preferences ➪ Main Menu from the top panel. The Main Menu editor appears.
- Click the Applications section drop-down arrow, then select the Other section heading. The list of other applications available appears on the right side of the window.
- Select the check box next to the Screens and Graphics entry, then click the Close button.
This process adds the Other section to the Applications menu area and places the Screens and Graphics menu item in that section. To start it, just select
Applications ➪ Other ➪Screens and Graphics from the Panel menu. Now you’re ready to manually configure your video card and monitor. The Screen tab shows the monitors detected on the system. You can manually set the features for each monitor, including its model and resolution capabilities. If you have multiple monitors, you can designate the default monitor and the secondary monitor. You can also indicate whether they should be cloned or, if you extend the desktop, which part of the desktop
each one handles. The
Graphics Card tab, lists the graphics cards detected on the system.This tab allows you to select the specific driver X.Org uses for the video card. You can select the driver by name used in the X
.Org configuration file Driver entry, or you can select it from a list of video card manufacturers and models. Once you’ve selected the video card and monitor settings, you can test your selection by clicking the Test button. X.Org will temporarily switch the desktop into the mode defined by the settings. In the new mode, a dialog box appears, asking whether you want to keep the new settings or revert to the original settings. Don’t worry if your desktop is inoperable with the new settings. If you don’t respond to the dialog box within 20 seconds, X.Org automatically reverts to the original settings.
Try to configure your desktop video settings using the Screen Resolution(Display) utility, if at all possible. Using the Screens and Graphics utility may (and usually does) break the default xorg.conf configuration file generated by Ubuntu. However, if X.Org can’t automatically detect your video card or monitor, you have no choice
but to resort to the Screens and Graphics utility.
Using 3-D Cards
In the past, one of the weaknesses of the Linux environment was its support for advanced video games. Many games popular in the Microsoft Windows world use advanced graphics that require specialized 3-D video cards, which Linux systems couldn’t support. In the past, specialized 3-D video cards were notorious for not working in the Linux environment because video card vendors never took the fledgling Linux market seriously. However, things are slowly starting to change. Two major 3-D video card vendors, ATI and NVIDIA, have released Linux drivers for their advanced products, allowing game developers to enter the Linux world. There’s a catch, though. Both ATI and NVIDIA released Linux binary drivers but not the source code for their 3-D video cards. A true open-source project must include source code for the binary drivers. This has caused a dilemma for Linux distributions. A Linux distribution that includes ATI or NVIDIA binary drivers violates the true spirit of open-source software. However, if a Linux distribution doesn’t provide these drivers, it risks falling behind in the Linux distribution wars and losing market share.
Ubuntu 3-D Support
Ubuntu has decided to solve this problem by splitting the difference. Ubuntu can detect ATI and NVIDIA video cards during the installation process and can install the proprietary binary drivers to support them. Ubuntu calls these restricted hardware drivers. Although Ubuntu supplies restricted hardware drivers, it doesn’t support them in any way. When you first log into the desktop after installation, Ubuntu displays a warning dialog telling you that restricted drivers have been installed. After the installation, an icon appears on the top panel, indicating that a restricted hardware driver has been installed and offering the option of removing the restricted drivers and replacing them with lesserquality open-source drivers.As with all things in the open-source programming world, there are current efforts to create open-source versions of many restricted hardware drivers. The Nouveau project is attempting to create a high-quality, open-source driver for operating NVIDIA cards in 3-D mode. At the time of this writing they’ve completed drivers for operating NVIDIA video cards in 2-D mode but haven’t finished the 3-D features. As Ubuntu progresses through new versions, it’s possible that a video card that once required a restricted driver will have an open-source driver in a newer distribution.
Viewing Restricted Hardware DriversYou can view which restricted hardware drivers Ubuntu installed by using the Restricted
Hardware Driver Manager. Start the Restricted Driver Manager by selecting
System ➪Administration ➪ Hardware Drivers from the Panel menu. If restricted drivers for any hardware device have been loaded, they appear in this list. You can disable the restricted driver by removing the check mark from the box in the Enable column. You can also view the state of the installed driver.
FONTSMost computer users don't even think about fonts. They just expect them to work and assume that text will look the same whether it's viewed onscreen, printed, or sent to another user in a document. However, font management is actually a surprisingly complex task due to the many subtle variations in the ways fonts can be created and used.
Fonts can be defined in a number of different ways and have a variety of file formats. Each operating system has its own method of managing and displaying them. Some fonts are designed as
bitmaps to be displayed onscreen, while others are
in vector format so they can scale up or down and be printed at high resolution. Some come as
bundles that include both bitmap and vector formats in the same package, with one used for onscreen display and the other used in printing or to generate files in output formats such as PDF. And some come as
families, with several variations such as bold and italic bundled together with the base font, providing much better results than working from a single base font and then applying such variations algorithmically.
Font Management with DefomaUbuntu uses
Defoma, the "
Debian Font Manager," to centralize and simplify font management across all applications. Applications can vary dramatically in how they manage fonts, so when a new font is installed on your computer, it's not always obvious how to tell each application that the font exists and where to find it.
Defoma gets around this problem by allowing applications to register themselves by providing a Defoma configuration script. Then, when a new font is installed, Defoma works through all the configuration scripts and performs whatever action is necessary to enable the font for each application. The first thing you should do then is make sure that your system is configured to use Defoma to manage fonts. Run:
$ sudo dpkg-reconfigure defoma
If Defoma is not currently set to manage fonts, you will be asked if you want to use it; answer Yes.
If your system has ended up in an unclean state with some manually installed fonts or applications that can't see some fonts, you can force Defoma to totally rebuild its configuration. This process rescans all your installed fonts and makes sure all registered applications have been updated to use them:
$ sudo defoma-reconfigure
Onscreen Font-Rendering PreferencesVarious displays have different characteristics, and what looks good on a CRT doesn't necessarily look good on an LCD. Ubuntu provides a number of font options through
System>Preferences>Font You can change the default system fonts to suit your preferences, but if you have an LCD, the item to pay attention to is the
subpixel smoothing option under
Font Rendering. Each pixel in an LCD consists of three subpixels, one each for red, green, and blue. Subpixel smoothing takes the physical layout of the subpixels into account to display fonts as smoothly as possible. Advanced optionsare accessible through the Details button near the bottom right. From here, you can specify
screen resolution, smoothing, hinting, and
subpixel order.
Screen resolutionWhen the font renderer displays text onscreen, it needs to convert between various units to determine how large the text needs to be. Often font sizes are specified as points, which are units of measure that have been used (rather inconsistently!) for hundreds of years by printers. Nowadays, most people agree on one point being equal to 1/72nd of an inch, but if you tell your computer to display, for example, 18-point text, it needs to know the resolution of your display so it can figure out how many pixels are equivalent to 18/72nds (i.e., 1/4) of an inch on your particular screen. Screen resolution is usually expressed as
dpi(dots per inch). To figure out the horizontal and vertical resolution of your screen, measure its width and height and then divide those values into the pixel dimensions set in
System>Preferences>Screen Resolution(Display). For example, a typical so-called 17-inch LCD will have physical dimensions of about 13.3 inches by 10.75 inches and run at a native resolution of 1280x1024 pixels. That gives a horizontal resolution of 1280 ÷ 13.3 = 96.2 dpi, and a vertical resolution of 1024 ÷ 10.75 = 95.3 dpi. Close enough to call it 96 dpi for both.
By determining the actual physical resolution of your display and setting the correct Resolution value in the Font preferences, you can ensure that when your computer displays a font onscreen at a specific size, it will be scaled to appear at that actual size.
SmoothingThe Smoothing setting actually
controls the level of antialiasing to apply when fonts are rendered. Antialiasing can have a dramatic impact on the clarity of fonts, particularly when displayed on an LCD. It smooths out jaggy corners and edges on fine lines by visually filling in gaps using surrounding pixels set to intermediate shades of grey.
If you have an LCD, for the best-looking fonts, you should definitely select Subpixel as the Smoothing setting.
HintingBecause computer screens operate at a much lower resolution than what we are used to seeing with printed material, fonts that are scaled down to a small size can sometimes suffer from effects whereby the shape and position of individual letters don't interact well with the pixel structure of the display itself, producing visible artifacts. For example, two letters next to each other that both have thin vertical lines may happen to fall slightly differently onto the pixel grid of the display, with the result that one line appears fatter than the other. A similar effect can occur with rounded letters, where fine curves may disappear or be inconsistent. Often the relative placement of letters will alter the visual effect of other letters around them.
Hinting is the process of making tiny adjustments in the outline-filling process while rendering fonts to compensate for effects that might cause individual characters to appear differently from the way they were designed. Doing accurate hinting requires more processor power whenever your computer needs to render large quantities of text, but the end result is text that appears smoother, more consistent and easier to read. You can choose from four hinting levels in Font Rendering Details:
- None,
- Slight,
- Medium, and
- Full.
The difference might seem subtle if you're not used to closely examining text and you don't know what to look for, but
if you have a relatively modern machine, it's worth turning on hinting. LCDs in particular can benefit greatly from it, giving you much more readable text and less eyestrain.Subpixel orderIn the main Font Preferences dialog, there was an option to turn on subpixel smoothing, but for it to be really effective, you also need to make sure your computer knows the physical structure of the individual subpixels. In reality,
subpixels are not dots: they're typically very short lines placed side by side. The vast majority of LCDs use an RGB order, but some reverse that and place the subpixels in BGR order. Then there are variations on those two options, with some manufacturers stacking subpixels vertically instead of placing them side by side. Selecting the option that matches your particular monitor structure will let your computer do the best job possible of smoothing fonts onscreen.
Install Microsoft Core FontsMicrosoft Windows comes bundled with a number of core
TrueType fonts. Because Windows is so widely used, many documents and web sites are designed around the core Microsoft fonts, and if you don't have them installed, your computer may not be able to display some documents as the author intended. Licence restrictions prevent the Microsoft fonts from being distributed directly as part of Ubuntu, but Microsoft does make them available for free download directly from its web site, and there is even an Ubuntu package that takes care of downloading and installing them for you:
$ sudo apt-get install msttcorefonts
The msttcorefonts package is part of the
multiverse repository, so it's not available on a standard Ubuntu installation and you may need to "Modify the List of Package Repositories" before you can install it. The package doesn't include the fonts themselves but instead connects to the Microsoft web site and downloads and installs them in the correct location on your computer. The fonts will then be available to applications the next time they start up.
Install Macintosh and Windows TrueType FontsInstalling TrueType fonts is very easy on Ubuntu. On your desktop or in a file-browser window, just type
Ctrl-L to access the
Open Location window; then type fonts:/// and click Open. You will then see a list of all the fonts you currently have access to on your system. Drag your new TrueType font from your desktop or file manager into the font-list window, and it will be automatically installed and made available to applications through Defoma the next time they start up. It's actually not quite that simple if the fonts come from a Macintosh system, because Mac OS embeds extra font information using a special format that Linux can't read directly.
Before you drag Mac OS fonts into your fonts:/// folder, you need to convert them with a utility called fondu, which you can install with the following command:
$ sudo apt-get install fondu
Then copy your Mac OS font directory to your Linux machine and run:
$ fondu *
inside it to generate converted TTF files.
The fonts:/// location isn't a real location in the filesystem. It's a virtual view that lets you manage the fonts that have been installed without having to worry about where they are actually located on disk. The fonts shown by default are the system-wide fonts that have been installed on your machine for all users to access, but when you drag a new font into the window, it actually stores it inside a hidden folder called
.fonts inside your home directory.
Reference
- Xorg Curators of the X Window System.
- Xorg downloads Want to download the source to the latest revision of X? Start at this list of mirror sites.
- XFree86 Project Home of The XFree86 Project, Inc., which has provided a graphical interface for Linux for nearly 10 years.
- KDE The place to get started when learning about KDE and the latest developments.
- GNOME The launch point for more information about GNOME, links to new clients, and GNOME development projects.
 The way to test if your microphone is actually working is by clicking on the “Test” button behind “Sound capture”. Press test and talk in your microphone. If you hear yourself with a slight delay from the speakers you have it working. If not try every option in the list (in the screenshot it’s on “ALSa – Advanced Linux Sound Architecture” between the “Sound capture:” and “test”. one of them should be working. Also note that there seems to be double values with exactly the same name but they do act differently! at least that was the case for me. Once you’ve done that and you found one that seems to be working (the right one for me was: the default “ALSA”) then you can start recording your microphone if you want. Try it out in gnome-sound-recorder(alias Sound Recorder).


